These Christmas party food recipes offer seven sweet and savoury options, with ingredients, methods and variations. Find practical advice on portions, preparation, serving and storage, and check substitutions carefully when catering for dietary requirements.
Looking for Christmas party food recipes? This selection includes small savoury bites and a fruit dessert for festive gatherings. Choose a manageable menu and try unfamiliar recipes in a small batch beforehand; the recipes are not presented as personally kitchen-tested.
Why Serve Small Bites at Christmas Parties?

Christmas party food can offer variety without a formal sit-down meal. Small portions make it easy for guests to try several dishes.
Practical Advantages
- Flexible preparation: some components can be prepared ahead, while others are best assembled just before serving.
- Individual portions: guests can sample different flavours without needing a large plate.
- Less last-minute work: a realistic menu leaves more time to enjoy the gathering.
- Budget planning: calculate quantities before shopping and use ingredients across dishes where suitable.
- Dietary choices: plan vegetarian, gluten-free or milk-free dishes around actual guest requirements. Lactose-free and milk-free are not the same.
Small bites also suit informal gatherings where people move around and chat. Provide seating and plates for anyone who needs them.
A Few Useful Principles
- Balance flavours: include savoury, sweet and fresh or tangy options.
- Keep presentation simple: clean platters and a few suitable herbs provide plenty of colour.
- Plan temperatures: include both hot and chilled dishes, with appropriate storage and serving arrangements.
- Allow for appetite: six to eight small pieces may suit a short drinks gathering, but should not automatically be treated as a full meal. Size, duration and other food matter.
- Make serving easy: choose manageable bites and provide utensils. Keep sharp cocktail sticks away from young children.
A small selection of festive party bites can be more enjoyable and manageable than a large menu that keeps the host in the kitchen.
Planning Quantities, Timing and Presentation

Decide how substantial the food needs to be, then plan preparation and fridge space as well as cooking time.
Estimating Portions
- A short drinks gathering: six to eight small pieces per person can be a starting estimate, rather than a guaranteed meal allowance.
- Before dinner: four to six small bites per person may be plenty, depending on the main meal.
- A longer gathering: ten to twelve substantial pieces per person is only a rough starting point; provide more food if the buffet replaces dinner.
- Individual needs: ask about dietary requirements and make textures and portion sizes suitable for the guests, including young children.
An Example Preparation Schedule
- Three days before: choose the menu and buy shelf-stable ingredients.
- The day before: prepare suitable components, cool cooked food promptly and refrigerate covered.
- Four to six hours before: finish any make-ahead cooking completely, then cool and refrigerate it safely. Do not leave cooked fillings on the worktop or partly cook meat to finish later.
- Near serving time: cook or reheat hot items in manageable batches, checking that their centres are thoroughly hot.
- Just before serving: assemble chilled platters, add garnishes and place clear ingredient and allergen labels beside each dish.
Arranging Platters
- Vary presentation safely: use stable serving stands and flat boards, keeping heavy or hot dishes easy to reach.
- Create a clear flow: leave space around dishes and keep the dessert area separate if useful.
- Keep temperatures controlled: use suitable hot-holding equipment and chilled trays or small batches from the fridge. Decorative cold stones do not establish a safe food temperature.
- Use simple garnishes: herbs and citrus can add colour; identify any extra allergens such as seeds or nuts.
Serving Equipment
- Separate utensils: provide a serving utensil for each dish and keep allergen-free preparations separate throughout, not just at the table.
- Sturdy plates: choose reusable or suitable disposable plates that hold the food securely.
- Hot-holding equipment: use equipment able to maintain food at 63°C or above when holding it hot; an insulated dish alone may not do so.
- Small cases and forks: make bite-sized food easier to handle, especially where pointed sticks would be unsuitable.
Storage and Reheating
- Refrigeration: cool cooked food and refrigerate within one to two hours at 5°C or below. Use within 48 hours or the shorter ingredient instruction; the cold fruit skewers below are best within 24 hours.
- Oven reheating: reheat only once until steaming hot throughout. Timings vary with size and starting temperature; a few minutes to crisp the outside may be insufficient.
- Air fryer: use a suitable setting and avoid crowding. Check the centre, aiming for 75°C for 30 seconds or an equivalent safe time and temperature.
- Texture: an oven often keeps pastry crisper than a microwave, but thorough heating matters more than the appliance choice.
A Portion Calculation Example
For 20 guests at a light drinks gathering, eight pieces each gives 160 pieces. If you chose eight different dishes, that would be roughly 20 pieces of each. This article offers seven recipes, so divide your chosen total accordingly and increase it if the food replaces a meal.
Final Preparations
- Readable labels: list relevant ingredients and allergens clearly; do not rely on appearance or an unlabelled dietary claim.
- Replenish small batches: keep reserve food at the correct temperature and replace platters as needed rather than topping up old food indefinitely.
- Choose simple assembly: leave only manageable finishing jobs for the last few minutes.
Seven Christmas Party Food Ideas at a Glance

-
Mini cheese quiches
Small pastry cases with an egg-and-cheese filling, served freshly cooked or safely chilled.
- Yield: depends on tin size and pastry coverage; the quantities below may leave extra filling rather than reliably making 24.
- Timing: allow preparation time plus baking until both pastry and filling are fully cooked.
- Tip: line the tins ahead and refrigerate. Ricotta offers a different texture, not an automatically lower-calorie result.
-
Salt cod croquettes
Crisp croquettes with a soft potato-and-fish centre.
- Yield: roughly 45–55 small pieces at 20–25 g each, depending on the finished mixture.
- Timing: allow cooking, cooling and shaping time, plus any desalting required by the fish supplier.
- Tip: chill the shaped croquettes before cooking and test one first. Oven-baked versions have a different texture from fried ones.
-
Caprese canapés
Tomato, mozzarella and basil on crisp toast or crackers.
- Yield: around 30 small canapés, depending on bread and topping size.
- Timing: approximately 15–20 minutes to assemble, plus toasting and cooling.
- Tip: use crisp bread and a little balsamic glaze, assembling shortly before serving.
-
Chocolate fruit skewers
A colourful fruit dessert with a chocolate drizzle or partial coating.
- Yield: about 30–40 small skewers, depending on fruit size and how many pieces you use.
- Timing: allow 20–30 minutes for preparation plus chilling. Melting chocolate is not the same as tempering it.
- Tip: dry washed fruit well before coating. Check the chocolate and decorations if catering for milk-free or vegan diets.
-
Festive bruschetta
Toasted bread with tomato and basil or cheese, fig and pomegranate toppings.
- Yield: about 20–24 small slices, depending on the loaf.
- Timing: around 15–20 minutes, allowing for the bread to toast.
- Tip: prepare toppings separately and assemble just before serving to preserve the crunch.
-
Breaded cheese bites
Small cheese balls with a crisp breadcrumb coating and a soft centre.
- Yield: about 35 balls with a 20 g cheese centre, before coating.
- Timing: allow mixing and coating time, at least 20–30 minutes of chilling, then cooking.
- Tip: a firm, well-chilled centre and complete coating help prevent leaks. Test one before cooking a full batch.
-
Puff pastry sausage bites
Small fully cooked cocktail sausages wrapped in pastry for a warm party snack.
- Yield: about 20 whole-sausage bites or 40 smaller halves, depending on sausage and pastry size.
- Timing: allow about 20 minutes to assemble, then bake according to the pastry and sausage instructions until fully hot.
- Tip: brush with egg for colour and serve with mustard or ketchup. Plant-based sausages require suitable pastry and glaze too.
General tips
- Variety: combine hot and chilled dishes with savoury and sweet flavours.
- Practicality: choose at least two dishes with components you can safely prepare ahead.
- Presentation: use uncluttered platters and simple edible garnishes.
Mini Cheese Quiches: Ingredients, Method and Variations

These small cheese quiches use ready-made pastry and a simple egg filling. Yield depends on your tin: do not overfill the cases to force all the mixture into them.
Ingredients for Mini Cheese Quiches
- About 230 g ready-rolled puff pastry, cut to fit small muffin tins. Shortcrust pastry is an alternative, but follow its baking instructions.
- 3 large eggs, lightly beaten.
- 200 ml single cream — whole milk gives a less rich filling and may affect setting time.
- 150 g grated low-moisture mozzarella — or a suitable mixture of cheeses.
- 50 g grated Parmesan, optional — use a vegetarian hard cheese if required.
- Up to ½ tsp salt — use less with salty cheeses.
- Black pepper, to taste
- 1 tbsp melted butter, divided between greasing the tin where needed and brushing the edges.
- 1 tbsp chopped parsley, optional
Method for Mini Cheese Quiches
- Heat the oven: follow the pastry packet’s temperature guidance and lightly grease suitable mini muffin tins if needed.
- Line the tins: press pastry circles into the bases and sides without stretching them thin. Chill if the pastry becomes warm.
- Prepare the bases: prick lightly with a fork; follow any packet advice on blind baking for filled tartlets.
- Mix the filling: combine eggs, cream, mozzarella, optional hard cheese, seasoning and parsley. Do not taste the raw egg mixture.
- Fill the cases: fill to about three-quarters. Bake excess filling separately in a suitable greased ovenproof dish rather than overflowing the pastry.
- Brush the edges: use the remaining melted butter sparingly.
- Bake thoroughly: start checking small quiches after about 15–20 minutes, but allow longer as needed. The pastry must be cooked underneath and the filling set and steaming hot throughout; check 75°C for 30 seconds or equivalent in the centre.
- Rest briefly: leave for a few minutes before lifting carefully from the tins.
- Serve or chill: serve promptly, or cool and refrigerate within one to two hours. Reheat only once until steaming hot throughout, not merely until the pastry feels warm.
- Store: refrigerate covered at 5°C or below and use within 48 hours, or sooner if an ingredient requires it.
Variations
- Cheese and herbs: add 1 tbsp chopped chives and 1 tsp fresh thyme.
- Bacon or ham: add 80 g fully cooked chopped bacon or 100 g cooked ham. This increases the filling volume and may require extra cases.
- Spinach and ricotta: use 150 g cooked, well-drained spinach and 100 g ricotta in place of the cream for a firmer variation. Use vegetarian cheese throughout if needed.
- Gluten-free: use suitable gluten-free pastry with its own baking guidance and prevent cross-contact. Chickpea flour is not a direct replacement for ready-made pastry.
- Alternative dairy texture: plain full-fat yoghurt and ricotta can produce a different filling, but test a small batch; no calorie reduction is claimed without calculating the actual ingredients.
Salt Cod Croquettes: Ingredients, Method and Variations

Salt cod croquettes combine flaked fish and potato in small crisp bites. Prepare the cod according to the supplier’s instructions before mixing the filling.
Ingredients for Salt Cod Croquettes
- 500 g desalted cod, cooked and flaked — this is the prepared weight. If starting with salted fish, follow its desalting instructions in the fridge.
- 500 g cooked, mashed potato — allow steam to escape so it is not watery. Properly prepared cooked cassava gives a different version.
- 1 medium onion, finely chopped
- 2 garlic cloves, finely chopped
- 2 eggs — one for the mixture and one for the optional breadcrumb coating.
- Up to 3 tbsp plain flour, to help bind the mixture. A suitable gluten-free flour changes the texture and should be tested.
- 2 tbsp chopped parsley
- Salt and black pepper, to taste — the fish may need no extra salt.
- Oil for frying, plus a little for the onion — use a thermostatically controlled deep-fat fryer according to its fill limits if deep-frying.
- Breadcrumbs for an optional coating — use verified gluten-free crumbs as well as suitable flour if required.
Method for Salt Cod Croquettes
- Prepare the cod: desalt in the fridge using the supplier’s soaking and water-changing instructions. Cook fully, then remove skin and bones and weigh out 500 g of flaked fish. A fixed soaking time does not suit every cut.
- Prepare the potato: cook until tender, drain well and mash without adding milk. Weigh 500 g of cooked mash.
- Soften the onion: heat a little oil and cook the onion and garlic until soft without burning. Stir in the prepared cod.
- Make the mixture: combine the fish mixture and potato. Let it cool enough not to scramble the egg, then mix in one beaten egg, parsley, seasoning and enough of the flour to bind. Do not taste the raw egg-and-flour mixture.
- Chill promptly: spread in a shallow container, cover once appropriate and refrigerate for about 30 minutes until firm. Do not leave the cooked mixture cooling for hours.
- Shape: with clean hands, form small croquettes of approximately 20–25 g each.
- Coat if wanted: dip in the second beaten egg, then breadcrumbs, pressing gently to cover. Keep unused raw coating separate from ready-to-eat food.
- Fry carefully: use the fryer’s instructions and an oil temperature around 170–180°C. Cook a small test portion, then small batches until golden and thoroughly cooked inside. Two to three minutes is not a reliable safety guarantee; check the centre reaches 75°C for 30 seconds or equivalent.
- Oven or air fryer: lightly oil the surface and use about 200°C/180°C fan in an oven or 180°C in an air fryer, adjusting to the appliance. Cook until the coating and centre are fully cooked, turning as needed; timings depend on size and temperature.
- Serve and store: serve hot with a suitable sauce. Cool leftovers promptly, refrigerate within one to two hours and use within 48 hours. Reheat only once until steaming hot throughout.
Variations and Tips
- Cheese croquettes: add 50–80 g grated mozzarella, noting the extra milk allergen and changed texture.
- Baked coating: use breadcrumbs and a light coating of oil, accepting a different result from deep-frying.
- Lemon and herbs: add a little finely grated lemon zest and 1 tsp thyme.
- Vegetarian variation: replace the fish with 400 g drained shredded hearts of palm or 300 g smoked tofu, then reassess moisture and seasoning. Check all other ingredients too.
- Control moisture: drain fish and potato well before mixing. Add flour gradually only if needed; do not pour in another whole egg without checking the consistency.
- Freezing: freeze freshly prepared shaped croquettes separately, then bag and label. For this untested homemade mixture, thaw in the fridge and cook thoroughly rather than assuming a few extra minutes from frozen will suffice. Follow ingredient refreezing restrictions.
Caprese Canapés: Ingredients, Method and Variations

Caprese canapés combine tomato, mozzarella and basil on crisp bread. Keep the dairy topping chilled until assembly.
Ingredients for Caprese Canapés
- 200 g cherry tomatoes, halved or cut smaller to fit the bread.
- 250 g mini mozzarella or bocconcini, drained and cut into suitable pieces. Use a suitable plant-based alternative for a vegan version.
- 1 medium baguette, cut into about 30 small slices. Actual yield varies; suitable crackers are an alternative.
- A handful of fresh basil leaves
- 2 tbsp extra virgin olive oil, divided between tomatoes and finishing.
- 2 tbsp balsamic glaze, or enough for a light drizzle.
- Salt and black pepper, to taste
- 1 garlic clove, optional, halved for rubbing on the toast.
Method for Caprese Canapés
- Toast the bread: bake at about 180°C/160°C fan until crisp and lightly golden, checking after six to eight minutes. Cool before topping.
- Season tomatoes: toss with a little salt and pepper and 1 tbsp of the oil. Leave briefly while preparing the cheese.
- Drain mozzarella: cut larger pieces to suit the toast and pat away excess moisture.
- Add garlic if wanted: lightly rub the cut clove over the toasted bread.
- Assemble: divide mozzarella and tomatoes among the toast slices, then add basil.
- Finish: drizzle with the remaining oil and balsamic glaze, adjusting seasoning sparingly.
- Arrange: put the canapés in a single layer on a serving platter.
- Assemble late: toast the bread ahead if needed, but keep chilled toppings separate and assemble shortly before serving.
Variations and Tips
- Pesto: replace some oil with a little pesto, checking nuts, milk and vegetarian suitability on the label.
- Prosciutto: add a thin strip if suitable for your guests; it makes the canapé non-vegetarian.
- Sweet and savoury: add a thin fig slice and a little honey instead of balsamic glaze. Do not give honey to babies under one.
- Vegan: use suitable plant-based cheese or ready-to-eat seasoned tofu and verify the bread and glaze too.
- Presentation: garnish the platter lightly with basil and lemon zest. Small forks avoid the need for sharp cocktail sticks.
- Storage: keep prepared components refrigerated and put out small batches shortly before eating. Texture and food safety should not be judged solely by a stated room-temperature serving time.
Chocolate Fruit Skewers: Ingredients, Method and Variations

Chocolate fruit skewers offer a colourful dessert with a partial chocolate coating or drizzle. Use clean, dry fruit and keep it chilled after preparation.
Ingredients for Chocolate Fruit Skewers
- 500 g strawberries, washed, dried and hulled; halve large berries.
- 2 medium bananas, peeled and cut into thick slices. Firm apple is an alternative.
- 1 small pineapple, peeled, cored and cut into manageable cubes; firm mango can be used instead.
- 2 kiwis, peeled and cut into thick pieces. Grapes are an alternative for adults; quarter them lengthways for young children.
- 200 g dark chocolate, for drizzling or partially coating the fruit. Check the label for milk if needed.
- 50 g white chocolate, optional, for a contrasting drizzle; use a suitable vegan version if required.
- Up to 1 tbsp coconut oil or 1 tsp butter, optional — add sparingly only if needed to loosen the chocolate; it will soften the finished coating.
- About 30–40 small food-safe skewers — these are served cold, so soaking for cooking is unnecessary. Use bowls and spoons for young children.
- Optional toppings: desiccated coconut, suitable sprinkles, finely chopped nuts or cacao nibs; label allergens and consider choking risks.
Method for Chocolate Fruit Skewers
- Prepare fruit: wash, dry, peel and trim as needed. Cut pieces to a similar manageable size.
- Assemble: thread fruit onto skewers, alternating colours and leaving a handle. Alternatively, arrange portions in small bowls.
- Melt chocolate gently: place chopped chocolate in a dry heatproof bowl over gently simmering water without the bowl touching the water. Stir until smooth and keep water out. Add a little optional fat only if needed.
- Microwave alternative: use medium power in short bursts, stirring between each, until just melted. Follow the chocolate’s instructions where provided.
- Coat lightly: drizzle chocolate over the fruit or dip only part of each piece, letting excess drip away. The quantity is not intended to completely encase all the fruit.
- Add toppings: sprinkle on your chosen decoration while the chocolate is still soft.
- Add white chocolate if wanted: melt it separately and drizzle sparingly over the fruit.
- Chill: lay on baking parchment and refrigerate until the coating firms, checking after about 10–15 minutes. Added fat affects how firmly it sets.
- Arrange on a platter: keep a single layer where possible, with a small amount of clean edible garnish if wanted.
- Store: refrigerate covered at 5°C or below and use within 24 hours, or sooner if fruit quality requires it. Bring out small portions for serving.
Variations and Tips
- Vegan: choose verified vegan chocolate and decorations, omit butter and use coconut oil only if needed. Coconut cream will not set like white chocolate.
- Crunchy topping: sprinkle finely chopped nuts onto the wet chocolate, if suitable for the guests.
- For young children: serve appropriately cut soft fruit in bowls without sharp sticks. Avoid whole grapes, whole nuts and marshmallows for young children.
- Reduce browning: a little lemon juice can help apple or banana, but dry the surface before adding chocolate.
- Simple display: use a clean platter or food-safe skewer stand. Do not stand exposed food in loose raw rice or crumbs.
- Dried fruit variation: add small pieces of pitted dates or apricots if suitable for the guests, checking sulphites on the label.
Festive Bruschetta: Ingredients, Method and Variations
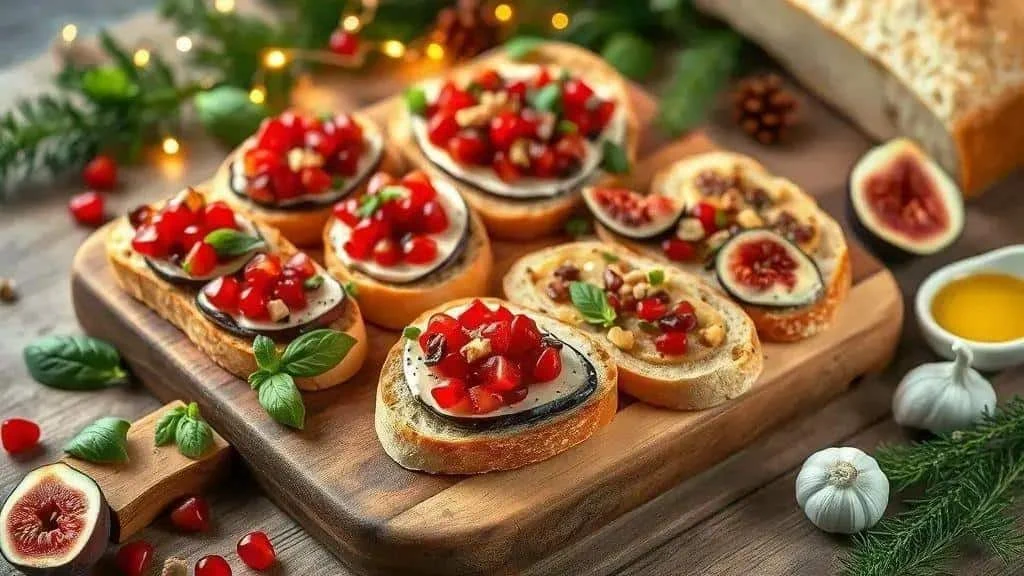
Festive bruschetta offers two toppings: tomato and basil, or cheese with fig and pomegranate.
Ingredients for Festive Bruschetta
- About 300 g baguette or Italian-style bread, cut into roughly 20–24 small slices about 1 cm thick. Use suitable gluten-free bread if needed.
- 3 tbsp extra virgin olive oil — reserve 1 tbsp for the tomato mixture and use the rest sparingly on the bread.
- 2 garlic cloves, halved.
- 300 g tomatoes, finely chopped and drained if very juicy.
- A small handful of fresh basil leaves, torn or left whole.
- 150 g Brie or goats’ cheese, cut into small pieces. Mozzarella gives a different flavour; choose cheese appropriate to your guests’ dietary needs.
- Fresh figs, thinly sliced — enough for your chosen cheese-topped slices; sizes vary considerably. Pear is an alternative.
- ⅓ cup pomegranate seeds — using a 240 ml measuring cup; softened dried cranberries are an alternative.
- 2 tbsp balsamic glaze, for a light drizzle.
- Salt and black pepper, to taste
Method for Festive Bruschetta
- Heat the oven: set to about 200°C/180°C fan and prepare a baking tray.
- Toast the bread: brush lightly with the allocated 2 tbsp oil and bake until golden, checking after six to eight minutes and turning if needed.
- Add garlic: lightly rub the cut cloves over the warm toast.
- Prepare tomatoes: combine with basil, the reserved 1 tbsp oil and a little seasoning.
- Make tomato bruschetta: spoon the mixture onto some toast slices and finish with basil.
- Make cheese bruschetta: top the remaining slices with cheese, fig and pomegranate, then add a little glaze.
- If warming cheese: briefly return the cheese-topped bread to the oven before adding fruit. Merely softening Brie is not a safe substitute for thoroughly cooking it where a guest needs to avoid uncooked mould-ripened soft cheese.
- Finish sparingly: use the measured glaze across the platters; extra oil is unnecessary.
- Serve promptly: arrange in a single layer and assemble moist fruit toppings shortly before eating.
Variations and Tips
- Sweet and savoury: replace cheese with a thin strip of prosciutto and use a little honey instead of glaze, if suitable for the guests. Honey is not for babies under one.
- Vegan: use suitable plant-based cheese and verify that the bread and glaze are vegan too.
- Crunch: add finely chopped walnuts or pistachios only where appropriate, keeping nut-free servings separate.
- For a group: prepare bread and toppings separately, chill perishables and assemble about 10–15 minutes before serving.
- Storage: prepare perishable toppings no more than a day ahead for this plan and refrigerate covered, following shorter label instructions. Keep dry toast separate and avoid assembling wet toppings early.
Breaded Cheese Bites: Ingredients, Method and Variations

Breaded cheese bites need a firm, well-chilled centre and an even coating. Different cheeses behave differently, so test one before cooking the full batch.
Ingredients for Breaded Cheese Bites
- 500 g grated low-moisture mozzarella — wet fresh mozzarella is unsuitable for this mixture without substantial adjustment.
- 200 g firm cream cheese — do not assume wet ricotta behaves identically.
- 2 large eggs, beaten — for coating, not for mixing into the cheese centre.
- 100 g plain flour — for the outer coating, with some likely left over. Suitable rice flour can be used with gluten-free breadcrumbs if required.
- 200 g breadcrumbs — panko gives a coarser finish; some may remain unused.
- Salt, only if needed — taste the cheese mixture before coating; a whole teaspoon may be excessive.
- Up to ½ tsp black pepper, to taste.
- 1 tsp dried oregano, optional
- Oil for cooking — use a thermostatically controlled fryer according to its instructions for deep-frying, or a light coating for oven and air-fryer trials.
Method for Breaded Cheese Bites
- Mix the cheeses: combine grated mozzarella and firm cream cheese, then add pepper, optional oregano and salt only if needed.
- Shape: form about 35 small balls using roughly 20 g cheese mixture each. Chill first if the mixture is too soft to handle.
- Coat in flour: lightly roll each ball in flour and shake off excess.
- Dip in egg: cover the entire surface in beaten egg.
- Add breadcrumbs: press crumbs all around, checking there are no gaps through which cheese can escape.
- Chill: refrigerate for at least 20–30 minutes, until firm. Keep unused egg coating away from ready-to-eat food.
- Heat safely: follow the fryer’s instructions, using an oil temperature around 170–180°C. Use temperature control, not a piece of bread as a substitute for a thermometer.
- Test, then cook: fry one first, then small batches without crowding. Cook until the coating is cooked through and the centre is thoroughly hot; timing depends on size and starting temperature. Remove with suitable utensils and drain.
- Air-fryer trial: lightly oil a test ball and cook at about 180°C, checking closely. This cheese-only mixture can leak, and an eight-to-ten-minute timing is not guaranteed.
- Oven trial: bake a test portion at about 200°C/180°C fan until fully hot and the coating cooked. The result may spread more than a fried version.
- Serve carefully: allow molten cheese to cool enough to eat, then serve with tomato sauce, chilli jam or another suitable dip.
- Storage: refrigerate uncooked coated bites promptly and cook within 24 hours for this plan. Cool cooked leftovers and refrigerate within one to two hours; use within 48 hours and reheat only once until steaming hot throughout. Do not assume a fixed few minutes is sufficient.
Variations and Tips
- A different centre: enclose a small cube of Cheddar or a piece of ready-to-eat pepperoni before coating, and test that the ball remains sealed.
- Herbs and spices: add 1 tbsp finely chopped parsley and chives or 1 tsp smoked paprika to the breadcrumbs.
- Sweet and savoury: try a small piece of firm guava paste inside the cheese mixture, sealing it fully before coating.
- Less cooking oil: an oven or air fryer uses less added oil, but test the mixture first rather than assuming the same result or a particular nutritional benefit.
- If cheese leaks: check the firmness, chilling and coating coverage. Do not simply add the coating flour to the centre, which changes the recipe and requires thorough cooking.
- Size matters: 15–20 g centres give small servings; larger balls need a different cooking time. Hot cheese can still burn even in a small bite.
Puff Pastry Sausage Bites: Ingredients, Method and Variations

Puff pastry sausage bites use fully cooked cocktail sausages in pastry strips. Raw sausage meat needs its own validated cooking method and is not a direct substitution here.
Ingredients for Puff Pastry Sausage Bites
- About 500 g ready-rolled puff pastry — thaw or handle according to the packet. Suitable gluten-free pastry is an alternative with its own baking instructions.
- 20 fully cooked cocktail sausages — sizes vary widely, so do not assume they weigh 600 g. Choose sausages labelled ready-to-eat or fully cook them first according to the packet.
- 1 large egg, beaten, for glazing. Use a suitable plant-based milk for a vegan version.
- 2 tbsp mustard, optional — a little suitable pesto is an alternative; check its allergens.
- 2 tbsp sesame or chia seeds, optional — or a little grated cheese, with the relevant allergens identified.
- Up to 1 tsp soft brown sugar, optional, mixed into the egg glaze for a little sweetness.
- 1–2 tbsp flour for the worktop, if needed — use suitable gluten-free flour when required.
- Dips, to serve — ketchup, mustard, mayonnaise or barbecue sauce, stored and labelled appropriately.
Method for Puff Pastry Sausage Bites
- Heat the oven: follow the pastry packet, usually around 200°C/180°C fan for this type of snack. Line a baking tray with suitable parchment.
- Prepare sausages: pat ready-to-eat sausages dry if necessary. Leave whole for about 20 bites or halve for smaller portions, adjusting pastry strips accordingly.
- Prepare pastry: unroll onto a lightly floured surface and keep it cool. Avoid rolling it unnecessarily thin.
- Cut strips: make strips about 2–3 cm wide and long enough to wrap each sausage. Dimensions depend on the actual sausage size.
- Add flavour if wanted: spread a very thin layer of mustard or suitable pesto over the pastry.
- Wrap: wind pastry around each sausage without pulling it tight, securing the seam underneath.
- Glaze: brush with beaten egg, including the optional teaspoon of sugar if used, then add the chosen seeds. For a vegan version, use plant milk and omit dairy toppings.
- Space out: leave at least 2 cm between pieces to allow the pastry to expand.
- Bake fully: follow the pastry and sausage guidance, checking as the pastry colours. Both the underside of the pastry and the sausage centre must be fully cooked or reheated; a fixed 12–15 minutes may be insufficient.
- Rest briefly: allow a few minutes before serving, as the filling can be very hot.
- Serve: arrange on a platter with dips in separate small bowls, bringing out fresh batches as needed.
- Store safely: cool and refrigerate within one to two hours, then use within 48 hours or sooner according to the sausage label. Since ready-cooked sausages have been heated during baking, avoid another reheating cycle; use safely chilled leftovers cold if the label allows.
Variations and Tips
- Vegetarian or vegan: use suitable plant-based sausages and follow their cooking instructions, along with vegan pastry and plant milk if required. Not every plant-based sausage is ready-to-eat.
- With cheese: add a thin strip of mozzarella or provolone before wrapping, avoiding overfilling.
- Spicy version: add a little chilli flake to the mustard if suitable for the guests.
- Smaller bites: use halved sausages and shorter pastry strips, checking doneness rather than automatically reducing baking to eight minutes.
- Freezing ahead: freeze assembled unbaked pieces only if both pastry and sausage instructions permit it. Thaw in the fridge and bake thoroughly; do not assume adding four minutes makes a frozen centre safe.
- Presentation: use a stable serving platter and keep decorative sticks out of food intended for young children.
Build a Manageable Festive Menu
A varied selection of party bites can make a Christmas gathering feel welcoming without requiring an elaborate meal. Plan quantities around the occasion and choose dishes you can serve safely.
Try unfamiliar recipes in a small batch before the event and adjust for your guests. A useful approach: prepare suitable components ahead, leaving only cooking and simple assembly for serving time.
Explore the I Love Christmas website for more festive food and entertaining ideas.
Christmas Party Food: Frequently Asked Questions
How many pieces should I allow per person?
Six to eight small bites can be a starting point for a short drinks gathering, or four to six before dinner. Increase quantities for a longer event or a buffet replacing a meal, taking portion size and appetite into account.
How should I store food prepared ahead?
Cool cooked food and refrigerate within one to two hours at 5°C or below. Use within 48 hours or the shorter ingredient guidance; prepare fruit skewers within 24 hours for this plan. Keep raw coatings separate from ready-to-eat foods.
Can I freeze prepared party food?
Some shaped croquettes or unbaked pastry bites can be frozen if their ingredients permit it. Label them and follow a suitable thawing and cooking method; do not assume every homemade item can be cooked safely from frozen with a few extra minutes.
What should I offer guests with dietary requirements?
Ask what they need, check all ingredient labels and prepare suitable alternatives separately. Use clear labels and separate utensils, and remember that vegan, gluten-free, lactose-free and milk-free describe different things.
How can I reheat food while keeping it crisp?
An oven or air fryer can restore crispness, but reheat only once until steaming hot throughout, checking the centre rather than relying on a short fixed time. Already reheated ingredients, such as cooked sausages heated again in pastry, should not go through another reheating cycle.
Sources and Further Reading
- Food Standards Agency: cooking food safely
- Food Standards Agency: chilling food safely
- Pascoal: preparing and desalting salt cod
- Food Standards Agency: allergen guidance
- NHS: foods to avoid for babies and young children
- NHS: listeriosis and higher-risk foods