
These crispy salt cod fritters, inspired by Brazilian bolinhos de bacalhau, combine prepared salt cod, dry mashed potato, herbs and a simple breadcrumb coating. Follow the fish supplier’s desalting instructions, chill the mixture before shaping and cook the centres thoroughly. Baked, cauliflower and miniature variations are included, with separate storage and reheating guidance.
Crispy salt cod fritters make a savoury party snack. The key is a well-drained mixture, consistent sizes and controlled cooking rather than relying on the colour of the crust alone.
Ingredients for Crispy Salt Cod Fritters
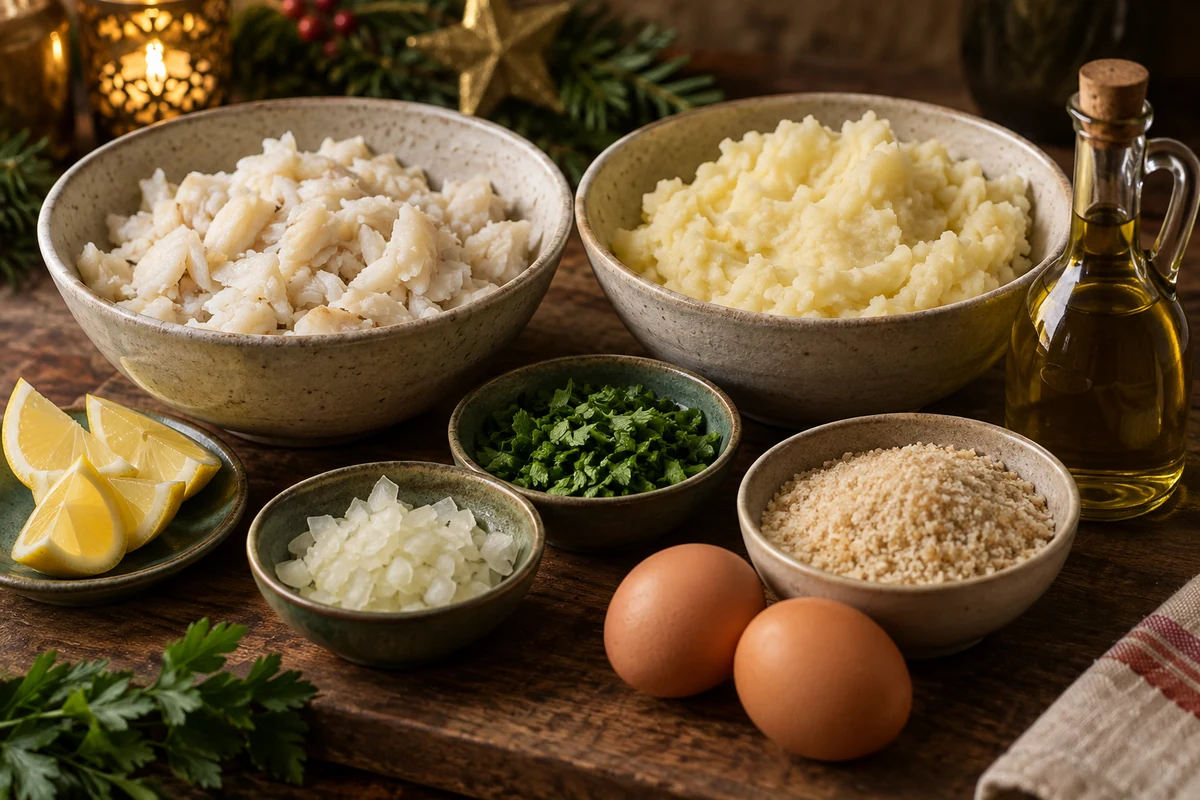
Gather the ingredients below. The fish and potato quantities refer to the prepared weights used in the mixture, so buy enough raw ingredients to allow for soaking, skins, bones and peeling.
- 500 g prepared salt cod — desalted according to the supplier’s instructions, fully cooked, skinned, boned, drained and flaked. Fresh cod, pollock or hake gives a different flavour; use an equivalent cooked, drained weight rather than assuming 700 g raw fish always yields the same amount. Fresh unsalted fish does not need desalting.
- 500 g cooked, peeled, mashed potato — plain and dry, without added milk or butter. Weigh it rather than relying on a count of three potatoes. Cassava has a different starch and moisture content and is not a guaranteed direct replacement.
- One medium onion — finely chopped and softened in a little of the cooking oil. Chopped leek gives a different flavour but two tablespoons is much less than a whole onion.
- Two garlic cloves — finely chopped, softened with the onion; ½ tsp garlic powder is an alternative.
- Two eggs — beaten, for binding the mixture. Replacing eggs does not make a fish recipe vegan; an egg-free version needs a separately tested binder.
- Up to 3 tbsp plain flour — add gradually to bind. A suitable rice flour may work differently; gluten-free preparation also needs appropriate crumbs and separate equipment.
- About ½ cup dry breadcrumbs or panko to start — for pressing onto the shaped mixture. The amount needed varies with shape and coating thickness; have more available if necessary.
- A small handful of chopped fresh parsley — roughly ¼ cup loosely filled; chives are an alternative.
- Salt only if needed — taste a little of the cooked fish and potato before adding raw egg or flour.
- ¼ tsp ground black pepper, or to taste — chilli flakes are an optional different flavour.
- Suitable frying oil — such as rapeseed or sunflower oil. The required volume depends on the fryer or pan; follow its fill limit rather than adding a fixed 1–1.5 litres. For a pan, never fill more than one-third with oil.
- Lemon zest and wedges, optional — to serve, kept out of the hot oil.
Ingredient notes
Salt cod: soaking time depends on cut and thickness; thicker pieces generally need longer, so follow the supplier. Potato should be well drained and steam-dried before mashing. For a crisp coating, press the moist shaped mixture directly into panko or fine breadcrumbs. This recipe uses the two eggs in the mixture and does not require an unlisted extra egg wash.
Alternatives: gluten-free flour and crumbs require checks on all ingredients and cooking equipment. Baking gives a different, usually less evenly crisp crust than frying; do not expect identical results.
How to Make Crispy Salt Cod Fritters
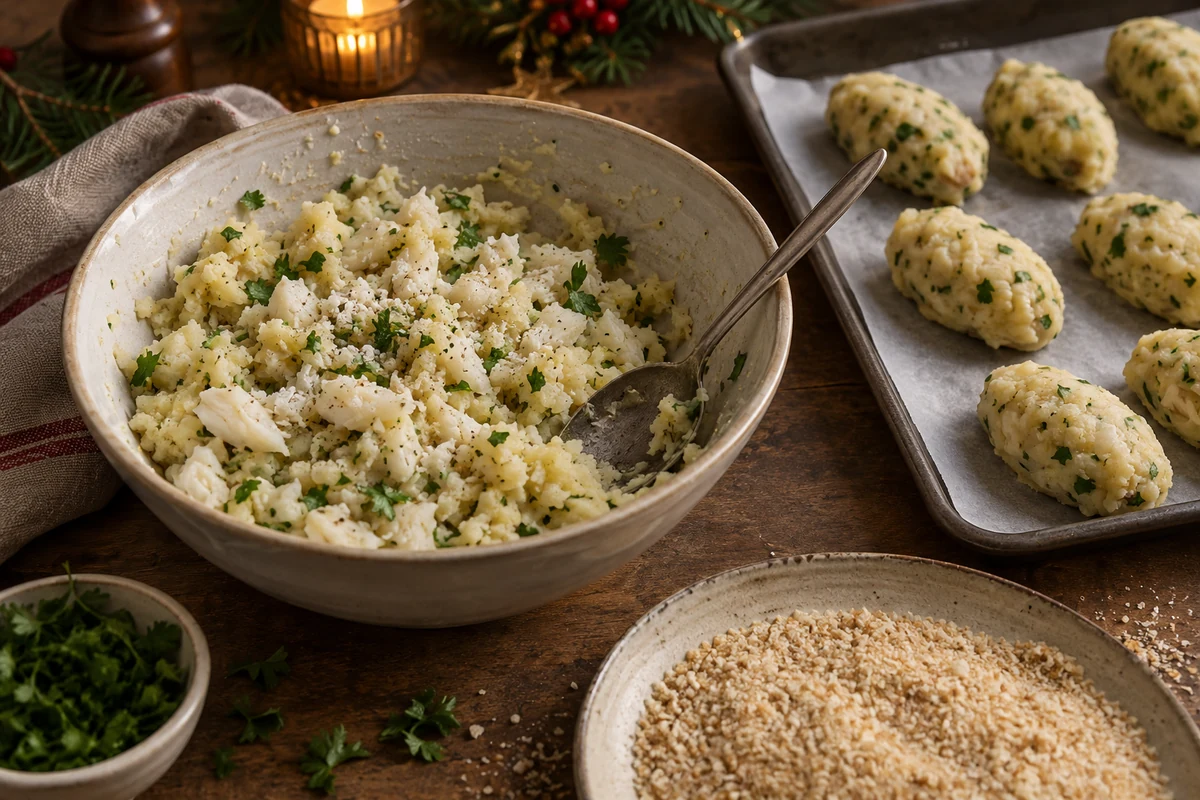
Prepare clean bowls, a masher, tray, strainer, suitable frying equipment and a food thermometer. Keep children away from hot oil and organise the work area before cooking.
- Prepare the salt cod: soak in the fridge, changing cold water as directed by the supplier; do not assume 24 hours suits every piece. Cook according to the product’s instructions until fully cooked and flaking, then drain and remove all skin and bones. Weigh 500 g prepared fish for the mixture.
- Prepare the potato: cook until tender, drain thoroughly and allow excess steam to escape. Peel if necessary and mash without liquid. Weigh 500 g of the cooked mash; cooking time depends on potato size and preparation.
- Combine the base: mix the flaked fish, dry mash, softened onion and garlic, parsley and pepper. Taste for salt now, before adding raw egg or flour. Let hot components cool promptly enough that they will not cook the eggs on contact.
- Add the binders: mix in the beaten eggs gradually, followed by the flour as needed, aiming for a mixture that holds its shape. Moisture varies, so do not force all the liquid in if it makes the mixture too loose. Do not taste it raw once egg or flour has been added.
- Chill: cover and refrigerate for 20–30 minutes to help the mixture firm up. Chilling does not compensate for excess liquid.
- Shape: use two spoons or clean lightly oiled hands to make similar ovals of about 25–30 g. Place on a lined tray and keep chilled while working.
- Coat: gently press each moist fritter into breadcrumbs or panko. This simple coating uses the listed ingredients. A separate flour–egg–crumb coating would require additional measured ingredients and is not part of this version.
- Use one complete cooking stage: for home preparation, cook each batch fully rather than partially frying it and leaving it to wait. The centre, not merely the crust, must reach a safe cooking temperature.
- Fry in small batches: heat suitable oil to around 175–180°C with a thermometer or controlled fryer. Lower a few chilled fritters carefully into the oil. About 3–5 minutes may be a starting guide, but size and equipment vary: check a representative centre reaches 75°C for 30 seconds, or 70°C for two minutes.
- Drain: lift out with a suitable slotted utensil and drain in one layer on a rack over a tray. Avoid piling them up, which traps steam.
- Adjust if needed: if the chilled mixture is too loose, add flour a little at a time; too much makes it heavy. If dry, add a little of the reserved beaten egg rather than an entire extra egg. Cook a test fritter fully before adjusting seasoning.
- Serve and store: serve hot with lemon and a suitable chilled dip. For advance preparation, use the cooling and freezing method below; do not assume a frozen centre becomes safe with only one extra minute of frying.
Quick preparation checks
Salt: taste the cooked fish mixture before raw binders go in, or taste a fully cooked test fritter. Texture: the mixture should hold a shape without being dry. Crispness: use a light crumb coating and controlled oil temperature.
Baked, Cauliflower and Mini Salt Cod Fritter Variations

Baked variation
Baking avoids a pan of deep oil and gives a different crust. Use the base seasoning and prepared fish and potato, with the following alternative binder and coating quantities.
- 500 g desalted, cooked, drained and flaked salt cod
- 500 g cooked, dry mashed potato
- Up to two beaten eggs — add gradually to bind, as above.
- 2 tbsp plain flour to start — a suitable rice flour changes the binding and needs a test batch.
- About ½ cup panko or breadcrumbs to start — have more available if needed for a light coating.
- A little oil spray or up to 2 tbsp olive oil — for lightly coating the surface.
- Heat the oven: set to 220°C, or 200°C fan, and use a suitable lined tray within the lining’s heat rating.
- Shape: make even 25–30 g portions and leave spaces between them.
- Coat lightly: press the moist shaped mixture directly into the crumbs; the listed eggs belong in the mixture, not a second egg wash.
- Add a little oil: lightly spray or brush the crumb coating.
- Bake: turn carefully partway through cooking and start checking after about 12–15 minutes. Continue until the centre is thoroughly cooked; that time is a check point, not a guaranteed finish.
- Check doneness: use the same safe centre temperature as the fried version. Avoid raising the oven sharply just to brown the outside while the middle is still cool.
Tip: a dry mash and even sizes help baking. A flatter shape cooks more evenly than a large thick ball.
Cauliflower variation
Cauliflower replaces potato for a different texture and flavour. This version has not been nutritionally analysed or tested for a specific ketogenic diet; almonds and optional cheese add allergens.
- 500 g prepared salt cod — cooked, drained and flaked.
- 350–400 g cooked cauliflower — finely chopped and thoroughly squeezed dry after cooling enough to handle.
- Up to two beaten eggs — add gradually, stopping when the mixture binds.
- 3–4 tbsp ground almonds — adjust gradually for consistency.
- 1 tbsp grated Parmesan, optional
- Dry the cauliflower: steam until cooked, cool promptly enough to handle and squeeze in a clean cloth to remove excess water without burning your hands.
- Mix: combine cauliflower, prepared fish, ground almonds and base herbs and seasoning, adding beaten egg gradually.
- Check binding: chill and cook one small test patty. Add a little more ground almond if necessary rather than assuming it behaves exactly like potato.
- Cook thoroughly: form small flatter patties and pan-fry in a little oil, turning carefully, or use a suitable air fryer according to its guidance. Check the centre temperature; two minutes per side or a fixed ten-minute air-fryer cycle is not a reliable safety guarantee.
- Serve: offer a suitable yoghurt-and-herb dip separately, kept chilled until needed.
Watch the surface: ground almonds brown readily, so lower the heat if the outside colours before the middle cooks.
Mini fritters
Smaller fritters are convenient for a party platter. Use small paper serving cups or forks rather than sharp decorative sticks, especially around children.
- Use the basic mixture — shape into 12–15 g portions.
- Coating: press lightly into panko or fine breadcrumbs.
- Shape evenly: weigh a few portions first to establish a consistent size.
- Chill to firm: refrigerate the coated pieces. Avoid a casual partial freeze before frying, which makes centre cooking less predictable.
- Cook: use the controlled frying method or the oven method above, checking earlier because the portions are smaller. Always verify thorough cooking rather than relying solely on a shorter timer.
- Present: serve in small food-safe paper cups or on a platter with forks and separate dip bowls.
Advance service: if cooking ahead, cool and refrigerate promptly, then reheat once until steaming hot throughout. For frozen portions, thaw safely in the fridge before using this recipe’s cooking or reheating method.
Frying, Coating and Party Presentation Tips

For crisp salt cod fritters, control moisture, size and cooking temperature. A golden surface alone does not confirm that the egg-containing centre is cooked.
- Oil temperature: aim for about 175–180°C for the single-stage method, checking with suitable equipment. Do not leave oil unattended or let it smoke.
- Oil level: follow the fryer’s marked limit. If using a suitable deep pan, keep the oil below one-third of its depth and allow space for bubbling and food displacement.
- Test one first: cook a representative fritter fully and check both texture and centre temperature before starting a larger batch.
- Avoid crowding: fry only a few at a time so the oil temperature remains reasonably stable.
- Drain in one layer: lift with a slotted utensil and use a rack over a tray to let steam escape.
- Reheating: an oven or suitable air fryer can restore some crispness, but the centre must become steaming hot. Do not describe a fixed five-minute warming as sufficient for every size.
A practical crumb coating
- Simple method: press crumbs directly onto the slightly moist shaped mixture, keeping the listed eggs and flour in the filling.
- Panko or fine breadcrumbs: panko gives a rougher crust; fine crumbs give a more even coating. Neither guarantees a safe cooked centre.
- Firm mixture: chill for 20–30 minutes before shaping and coating, while keeping total preparation time controlled.
- Coating thickness: one light layer is enough here. A double egg-and-crumb coat would require extra ingredients and a separate method.
- Moisture control: drain fish and potato well at the start. Adding large amounts of flour later can make the fritters heavy.
Party presentation
- Consistent size: use 25–30 g portions for the main recipe or 12–15 g for miniatures, keeping each cooking batch uniform.
- Serving equipment: serve freshly cooked in small batches. A warm plate or decorative heat lamp alone is not verified hot holding.
- Simple garnish: lemon wedges and a little parsley or chives add colour. Keep wet garnish out of frying oil.
- Dips: use small separate bowls of a suitable mayonnaise, herb dip or sweet-and-sour sauce, with allergens identified.
- Easy serving: offer small forks or individual paper cups rather than inserting sharp picks into every fritter.
- Replenishment: cook manageable batches and replace serving platters promptly rather than keeping all the food lukewarm for hours.
- Advance preparation: label chilled or frozen portions clearly as uncooked or cooked, with the preparation date, so the correct next step is obvious.
Final priority: attractive presentation helps, but properly cooked centres and prompt service matter more than an elaborate display.
Storage, Reheating and Party Service
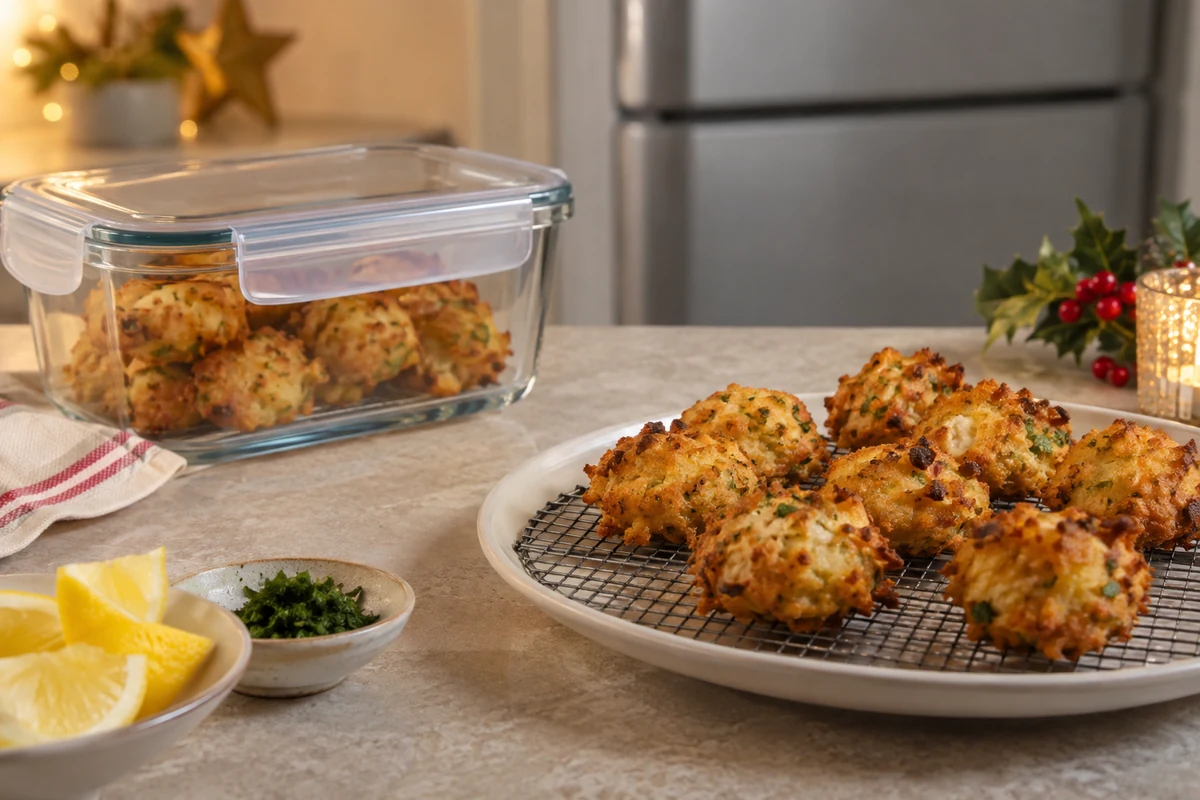
Cool cooked fritters promptly in shallow, separated portions and refrigerate within one to two hours. This is a maximum cooling window, not a reason to leave them out for two hours. Keep them protected and avoid piling hot fritters into a deep sealed container.
Storage
- Refrigerator: store covered at 5°C or below and use within 48 hours of cooking, or sooner if an ingredient requires it. An insulated box on its own is not a refrigerator.
- Freezer: freeze suitable promptly cooled cooked portions, or freshly prepared uncooked portions, separately on a tray and then seal. Label which they are. Use within three months for best quality, subject to ingredient and freezer guidance; do not freeze food that has already been handled or held unsafely.
- Separate layers: use suitable food-safe baking paper between portions to prevent sticking.
- Label: include the preparation and freezing dates, allergens, and whether the fritters still need cooking or only reheating.
Reheating cooked fritters
- Oven: heat to 200°C, or 180°C fan. Arrange chilled cooked fritters in one layer on a rack over a tray and start checking after 8–12 minutes. Continue until steaming hot throughout, turning as needed.
- Air fryer: use around 180°C if suitable for the appliance and start checking after 6–8 minutes. Leave space between pieces and continue until the centres are thoroughly hot.
- Frying pan: surface toasting for two or three minutes per side may not heat the centre adequately. For thick chilled fritters, the oven is easier to control; verify the centre rather than briefly covering the pan and assuming it is ready.
- Frozen portions: thaw fully in the fridge first for this home method. Uncooked portions then follow the frying method at 175–180°C with centre checks; cooked portions are reheated once. A fixed 3–5 minutes from frozen is not a reliable safety instruction.
- Microwave: it can soften the crust. If using it to defrost, follow the appliance guidance and cook or reheat immediately afterwards; do not partially thaw and leave food waiting.
- Safety: check a representative centre reaches 75°C for 30 seconds, or 70°C for two minutes. The 63°C hot-holding threshold is not the cooking target. Reheat cooked leftovers only once.
Serving at parties
- Uniform portions: consistent small fritters are easier to cook evenly and serve neatly.
- Hot holding: use suitable equipment that actually keeps food above 63°C, checking temperature, or serve fresh batches promptly. A lamp or warm tray without monitoring is not enough.
- Presentation: provide forks, small plates or food-safe paper cups, allowing very hot food to cool enough to eat safely.
- Sauces: keep perishable dips chilled until service and offer ingredients appropriate for guests’ needs.
- Kitchen organisation: keep raw mixture separate from cooked food, with clean utensils for serving and manageable cooking batches.
- Allergen information: identify fish, egg and wheat in the main recipe, plus milk or almonds where variations use them.
Planning ahead: allow enough time for safe fridge thawing if using frozen portions. Do not rely on an unverified cook-from-frozen shortcut for a large party.
Ready for the party table
Dry, well-prepared ingredients and even shapes help these salt cod fritters cook consistently. Make a small test batch when changing ingredients or equipment, and check the centres as well as the crust.
If you try the recipe, share whether you fried or baked it and which accompaniments you enjoyed.
Visit the I Love Christmas blog for more festive recipes and serving ideas.
Crispy Salt Cod Fritters: Frequently Asked Questions
How long can I keep cooked fritters in the fridge?
Cool promptly, refrigerate within one to two hours and keep covered at 5°C or below. Use within 48 hours of cooking, or sooner if ingredient guidance requires it. Reheat only once until thoroughly hot.
Can I freeze the fritters?
Yes, if prepared and handled safely. Freeze cooked and uncooked portions separately, label them clearly and aim to use within three months for quality, subject to ingredient guidance. Thaw fully in the fridge, use within 24 hours after defrosting, then cook uncooked portions or reheat cooked ones thoroughly.
How can I reheat them while keeping some crispness?
Use an oven at 200°C, or 180°C fan, or a suitable air fryer around 180°C, in one layer. Timings vary; continue until the centre is steaming hot and meets the safe time-and-temperature guidance above. Reheat only once.
How do I control the salt?
Follow the salt cod supplier’s refrigerated soaking instructions, which vary by thickness. Taste the cooked fish and potato before adding raw egg or flour, or taste a fully cooked test fritter. Lemon zest and herbs add flavour without extra salt.
Can I make gluten-free or cauliflower versions?
Suitable gluten-free flour and crumbs can be tried with separate clean equipment, but binding may differ. The cauliflower-and-ground-almond variation also needs a small test batch and thorough cooking; it is not a nutritionally verified ketogenic recipe.
Can I prepare them ahead for an event?
Yes. Prepare manageable portions, store them safely and label whether they are cooked or uncooked. Allow time for fridge thawing where needed, then cook or reheat thoroughly and serve in small fresh batches.
Sources and Further Reading
- Food Standards Agency — Cooking your food
- Food Standards Agency — Chilling, freezing and defrosting food safely
- London Fire Brigade — Deep fat fryer safety
- Food Standards Agency — Food allergies, intolerances and coeliac disease